DispatcherServlet의 처리 과정

1. HTTP 요청이 들어오면,
2. HandlerMapping을 통해 적합한 컨트롤러와 메소드를 찾고,
3. 컨트롤러로 위임할 핸들러 어댑터를 찾아서 실행함.
4. 핸들러 어댑터가 컨트롤러로 요청을 위임하고,
5. 컨트롤러에는 -> service -> repositry ... 개발자가 구현한 로직에 대한 결과를 모델(ModelAndView)로 가져옴.
6. View 정보가 있을 경우, DispatcherServlet이 적절한 VeiwResolver를 찾아 호출함.
7. ViewResolver는 View를 찾아서 반환해줌.
8. 해당 View는 전달받은 model값으로 화면 랜더링을 하고,
9. HTTP 응답을 (HTML로) 반환함.
@Controller

@RequestMapping
public String ~~~() {
	return "view";
}
템플릿 엔진 개념
템플릿 엔진 : 서버에서 데이터를 받아 우리가 보는 HTML 웹페이지에 데이터를 넣어 보여주는 도구
타임리프 표현식과 문법
타임리프의 핵심은 th:xxx가 붙은 부분은 서버측에서 랜더링 되고, th라는 값이 없으면 HTML의 기존 태그를 그대로 따름.
따라서 HTML 파일을 그대로 유지하면서 템플릿을 랜더링할 수 있는 기능이 가능한 것임.
1단계 : 블로그 글 목록 뷰 구현
1) 컨트롤러 구현
요청을 받아 사용자에게 뷰를 보여주려면 뷰 컨트롤러가 필요하다.
먼저 뷰(HTML)에게 데이터를 전달하기 위한 객체를 생성하기 위해 dto 패키지에 ArticleViewResponse 클래스를 생성했다.
public class ArticleViewResponse{
    private Long id;
    private String title;
    private String content;

    public Long getId() {
        return id;
    }

    public String getTitle() {
        return title;
    }

    public String getContent() {
        return content;
    }

    public ArticleViewResponse(Article article) {
        this.id = article.getId();
        this.title = article.getTitle();
        this.content = article.getContent();
    }
}
그리고 GET /articles 요청을 처리할 컨트롤러 코드를 작성할 것이다. controller 패키지에 BlogPageController 클래스를 생성한다.
@Controller
public class BlogPageController {
    private BlogService blogService;

    public BlogPageController(BlogService blogService) {
        this.blogService = blogService;
    }

	@GetMapping("/articles")
    public String getArticles(Model model) {
        List<ArticleViewResponse> articles = blogService.findAll().stream()
                .map(ArticleViewResponse::new)
                .toList();
        model.addAttribute("articles", articles);   // model에 블로그 글 리스트 저장

        return "articleList";   // articleList.html라는 뷰 조회
    }
}
- addAttribute 메소드를 이용해 모델에 값을 저장한다. ("articles"라는 키에 블로그 글 리스트를 저장함) 여기서 return 값인 "articleList"는 resource/templates/articleList.html 라는 뷰를 찾을 수 있게 뷰의 이름을 적은 것이다.
2) 뷰(HTML) 생성
<!DOCTYPE html>
<html xmlns:th="http://www.thymeleaf.org">
<head>
    <meta charset="UTF-8">
    <title>블로그 목록</title>
    <link rel="stylesheet" href="https://stackpath.bootstrapcdn.com/bootstrap/4.1.3/css/bootstrap.min.css">
</head>
<body>
<div class="p-5 mb-5 text-center</> bg-light">
    <h1 class="mb-3">My Blog</h1>
    <h4 class="mb-4">블로그에 오신 것을 환영합니다.</h4>
</div>

<div class="container">
    <div class="row-6" th:each="item : ${articles}">  <!-- articles 갯수 만큼 반복 -->
        <div class="card">
            <div class="card-header" th:text="${item.id}">  <!-- item의 id 출력-->
            </div>
            <div class="card-body">
                <h5 class="card-title" th:text="${item.title}"></h5>
                <p class="card-text" th:text="${item.content}"></p>
                <a href="#" class="btn btn-primary">보러가기</a>
            </div>
        </div>
        <br>
    </div>
</div>

</body>
</html>
- 코드에서 타임리프 문법이 적용된 부분을 잠깐 살펴보자.
1) th:each로 "articles" 키에 담긴 데이터 개수만큼 반복한다.
2) th:text는 반복 대상 객체의 id를 텍스트로 출력한다. 마찬가지로 body에서 title과 content도 텍스트로 출력해준다.
articleList.html은 현재 DB에 있는 글 목록 데이터들을 보여주는 페이지이다.
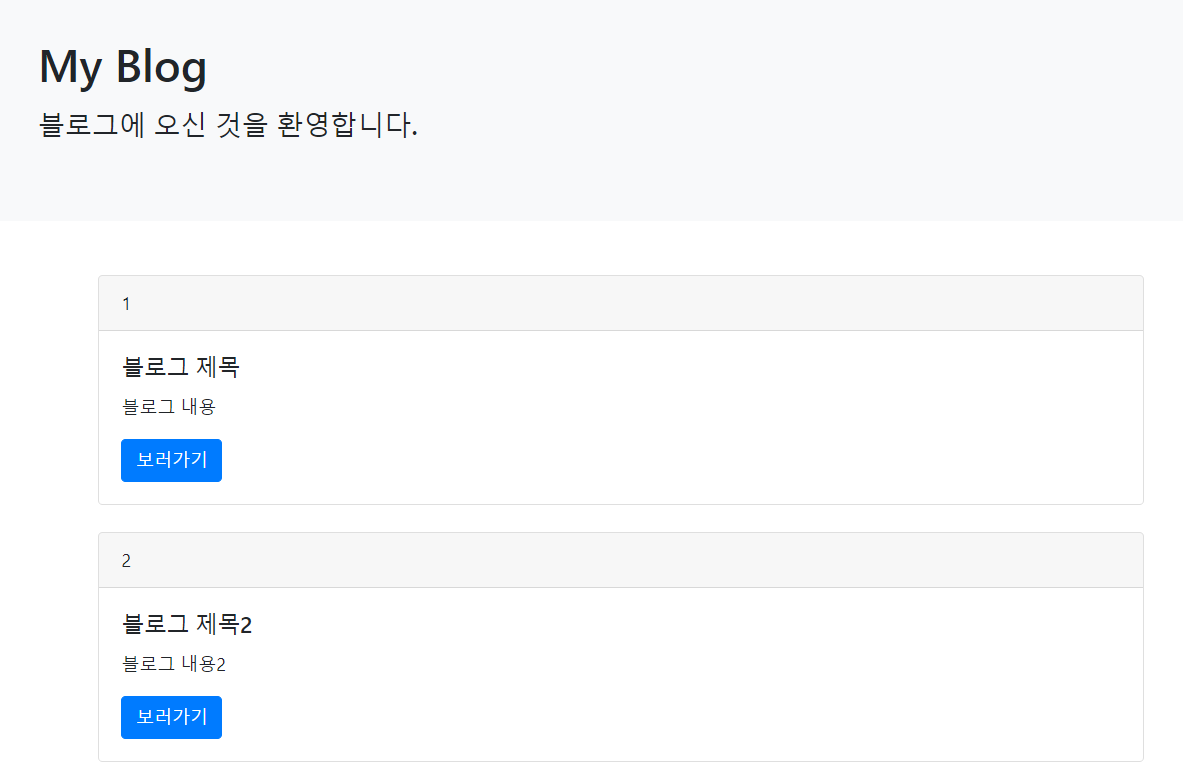
DB에 들어있는 글 목록이 잘 나오는 것을 확인 할 수 있다.
글 목록 뷰까지 구현 완료!
2단계 : 블로그 글 뷰 구현
이제 글 목록 뷰에서 '보러가기'를 눌렀을 때 나오는 블로그 글 뷰 화면을 구현해보자.
1) 엔티티에 생성 시간, 수정 시간 추가
글 생성 시간, 수정 시간을 출력하고싶기 때문에 먼저 엔티티에 생성 시간, 수정 시간을 추가해준다.
@CreatedDate
@Column(name = "created_at")
private LocalDateTime createdAt;

@LastModifiedDate
@Column(name = "updated_at")
private LocalDateTime updatedAt;
- 이렇게 Article 엔티티에 created_at, updated_at 필드를 추가해주었다.
- @CreatedDate : 엔티티가 생성될 때 생성시간을 테이블의 created_at 컬럼에 저장함.
- @LastModifiedDate : 엔티티가 수정될 때 마지막으로 수정된 시간을 updated_at 컬럼에 저장함.
@EntityListeners(AuditingEntityListener.class)- 그리고 수정할 엔티티 클래스에 @EntityListeners 을 적용해야한다. 얘는 엔티티의 변화를 감지하여 엔티티와 매핑된 테이블의 데이터를 조작하는 역할을 한다.
- 추가한 AuditingEntityListener.class는 Spring Data JPA에서 제공하는 이벤트 리스너인데, 엔티티의 수정, 영속 이벤트를 감지하는 역할을 한다.
이제 최초 생성 SQL(data.sql)을 수정해야한다. 스프링 부트 서버를 최초 실행할 때 created_at, updated_at을 수정하도록 data.spl 파일에 쿼리를 추가해준다.
INSERT INTO article (title, content, created_at, updated_at) VALUES ('제목1', '내용1', NOW(), NOW());
INSERT INTO article (title, content, created_at, updated_at) VALUES ('제목2', '내용2', NOW(), NOW());
INSERT INTO article (title, content, created_at, updated_at) VALUES ('제목3', '내용3', NOW(), NOW());
자동 업데이트를 위해 스프링 부트 메인 클래스에 @EnableJpaAuditing 어노테이션을 추가해준다. 이제 JPA Auditing을 사용해 엔티티의 변경 이력을 추적하고, 생성일자와 수정일자를 자동으로 설정할 수 있다.
2) 컨트롤러 작성
dto 패키지에 있는 ArticleViewResponse 클래스를 수정한다.
public class ArticleViewResponse {
    private Long id;
    private String title;
    private String content;
    private LocalDateTime createdAt;

    public ArticleViewResponse() {
    }

    public Long getId() {
        return id;
    }

    public String getTitle() {
        return title;
    }

    public String getContent() {
        return content;
    }

    public LocalDateTime getCreatedAt() {
        return createdAt;
    }

    public ArticleViewResponse(Article article) {
        this.id = article.getId();
        this.title = article.getTitle();
        this.content = article.getContent();
        this.createdAt = article.getCreatedAt();
    }
}
LocalDateTime에 대한 변수와 Getter, 메서드를 추가해주었다.
이제 뷰에서 사용할 dto 클래스를 구현했으니 본격적으로 이것을 전달할 수 있는 매개체인 Controller 메소드를 작성한다.
BlogPageController 클래스에 showArticle() 메소드를 추가해준다.
@GetMapping("/articles/{id}")
    public String showArticle(@PathVariable Long id, Model model) {
        Article article = blogService.findById(id);
        model.addAttribute("article", new ArticleViewResponse(article));

        return "article";
    }
- showArticle() 메소드는 @PathVariable로 넘어온 id값을 받아서 findById(id)로 글을 조회한다. 조회 결과로 받아온 article을 화면에서 사용할 모델에 저장한 다음, 최종적으로 보여줄 HTML 뷰 이름을 return한다.
3) 뷰(HTML) 만들기
이제 글 상세 내용을 보여주는 article.html을 만든다.
```html
<!DOCTYPE html>
<html xmlns:th="http://www.thymeleaf.org">
<head>
    <meta charset="UTF-8">
    <title>블로그 글</title>
    <link rel="stylesheet" href="https://stackpath.bootstrapcdn.com/bootstrap/4.1.3/css/bootstrap.min.css">
</head>
<body>
<div class="p-5 mb-5 text-center</> bg-light">
    <h1 class="mb-3">My Blog</h1>
    <h4 class="mb-3">블로그에 오신 것을 환영합니다.</h4>
</div>

<div class="container mt-5">
    <div class="row">
        <div class="col-lg-8">
            <article>
                <input type="hidden" id="article-id" th:value="${article.id}">
                <header class="mb-4">
                    <h1 class="fw-bolder mb-1" th:text="${article.title}"></h1>
                    <div class="text-muted fst-italic mb-2" th:text="|Posted on ${#temporals.format(article.createdAt, 'yyyy-MM-dd HH:mm')}|"></div>
                </header>
                <section class="mb-5">
                    <p class="fs-5 mb-4" th:text="${article.content}"></p>
                </section>
                <button type="button" id="modify-btn"
                        th:onclick="|location.href='@{/new-article?id={articleId}(articleId=${article.id})}'|"
                        class="btn btn-primary btn-sm">수정</button>
                <button type="button" id="delete-btn"
                        class="btn btn-secondary btn-sm">삭제</button>
            </article>
        </div>
    </div>
</div>

<script src="/js/article.js"></script>
</body>
```
- 템플릿 함수중 ${#temporals.format()}은 날짜 형식을 yyyy-MM-dd HH:mm 으로 포맷팅한다.
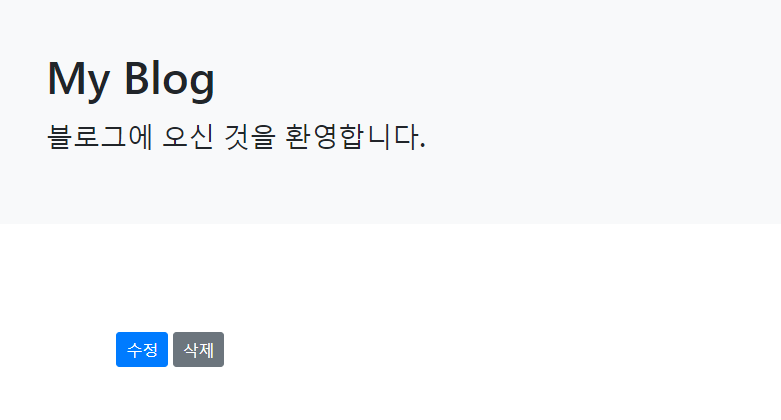
article.html은 글 상세 내용을 보여주는 페이지이다.
이렇게 구현한 글 상세 내용 페이지는 글 목록 화면에서 클릭해 타고 들어갈 수 있어야 한다.
따라서, 글 목록 화면 수정도 필요하다.
<a href="#" class="btn btn-primary">보러가기</a>articleList.html의 보러가기 버튼 부분의 href 속성을,
<a th:href="@{/articles/{id}(id=${item.id})}" class="btn btn-primary">보러가기</a>th:href 속성으로 변경하고 URL 표현식인 @{...}을 사용해서 '보러가기' 버튼을 클릭했을 때 상세 내용 페이지로 이동할 수 있도록 변경한다. '보러가기'를 클릭했을 때 페이지가 /articles/{itme.id}로 치환되면서 만들어놓은 controller로 요청이 들어올것이다.

실제로 id가 1인 글 목록의 보러가기 버튼을 눌렀을 때, id가 1인 title과 content의 내용이 보여지는 화면이 잘 나왔다.
글 상세 내용 뷰까지 구현 완료!
3단계 : 블로그 글 삭제 기능 구현
이제 글 상세 페이지에서 '삭제' 버튼을 클릭했을 때 글이 삭제되는 기능을 구현해보자.
삭제 기능 코드는 자바스크립트로 작성한다.
먼저 src/main/resources/static/js 디렉토리에 article.js 파일을 생성한다.
const deleteButton = document.getElementById('delete-btn');

if (deleteButton) {
    deleteButton.addEventListener('click', event => {
        let id = document.getElementById('article-id').value;
        fetch(`/api/articles/${id}`, {
            method: 'DELETE'
        }).then(() => {
            alert('삭제가 완료되었습니다');
            location.replace('/articles');
        });
    });
}
- 위 자바스크립트 코드는 HTML에서 id를 'delete-btn'로 설정한 엘리먼트를 찾고, 그 엘리먼트에서 클릭 이벤트가 발생하면 fetch() 메소드를 통해 DELETE /api/articles/${id} 요청을 보내는 역할을 한다.
- then() 메소드는 fetch()가 잘 완료되면 실행되는 메소드이다. fetch에서 API 요청이 완료되면 alert()를 통해 '삭제가 완료되었습니다'라는 팝업을 띄운다.
- location.replace() 메소드는 실행시 사용자의 웹 브라우저 화면을 현재 주소로 옮겨주는 역할을 한다. 즉 여기선 삭제한 후 다시 글 목록 화면으로 사용자의 화면을 옮긴다.
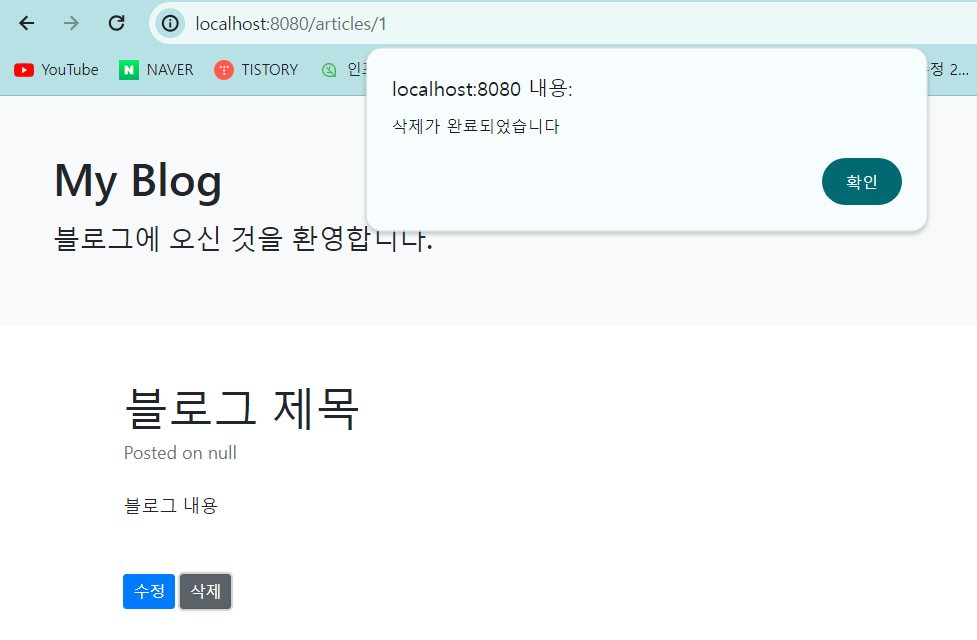
직접 실행해보면 정상적으로 삭제가 잘 되는 것을 볼 수 있다.
글 목록 삭제까지 구현 완료!
4단계 : 블로그 글 수정/생성 기능 구현
이제 글 수정/생성 기능을 추가해보자. 보통 블로그 글 수정과 생성은 같은 화면에서 벌어진다.
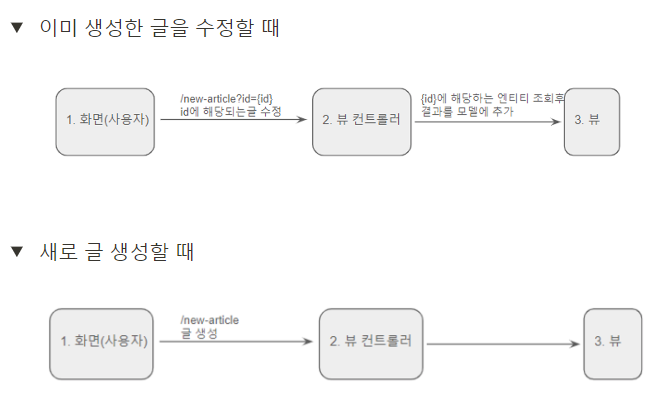
글을 생성할 때는 URL에 별도 쿼리 파라미터가 없지만 수정할 땐 URL에 ?id=123과 같이 쿼리 파라미터를 추가해 요청한다.
쿼리파라미터란?
URL 끝에 ?로 시작하는 키 값으로 이루어진 문자열이며 &로 구분한다. ex) ?id=123 -> id가 키, 123은 값
- 쿼리 파라미터가 있는 경우 : 이미 생성한 글을 수정한다는 것 이므로 엔티티를 조회하여 기존 글 데이터를 모델에 넣어 화면에서 보여줘야한다.
- 쿼리 파라미터가 없는 경우 : 글을 새로 생성할 때 이므로 화면에 아무것도 보여줄 필요가 없다.
그리고 뷰에서는 쿼리 파라미터의 id 여부에 따라 [수정] 버튼과 [등록] 버튼 중 적절한 버튼을 보여줘야 한다.
1) 수정/생성 컨트롤러 추가
먼저 BlogPageController 클래스에 newArticle() 메소드를 추가해준다.
// id 키를 가진 queryParameter 값을 id변수에 매핑(id값이 없을 경우도 있음)
    @GetMapping("/new-article")
    public String newArticle(@RequestParam(required = false) Long id, Model model) {
        if (id == null) {
            model.addAttribute("article", new ArticleViewResponse());
        } else {
            Article article = blogService.findById(id);
            model.addAttribute("article", new ArticleViewResponse(article));
        }
        return "newArticle";
    }
- id 키를 가진 쿼리파라미터 값이 넘어오면, id 변수에 매핑한다. 이 값은 없을수도 있으므로 required=false로 넣어준다. 만약 id값이 없다면 새롭게 생성을 해주고, 있다면 수정을 해준다.
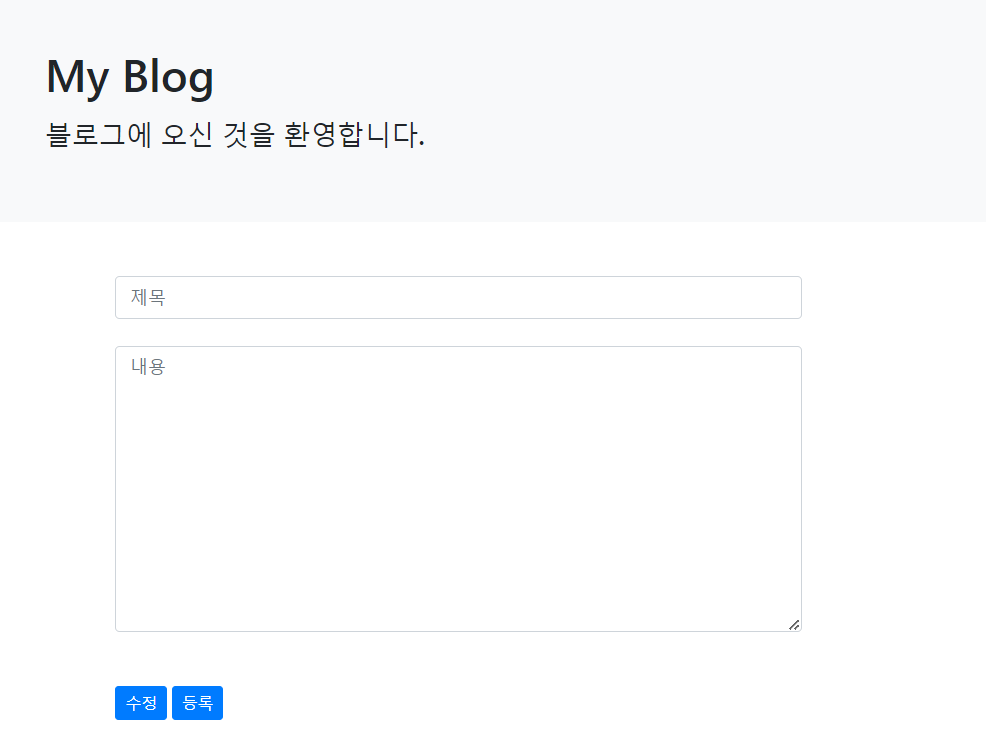
2) 수정/생성 뷰(newArticle.html) 추가
먼저 수정/생성 시 사용할 newArticle에 해당하는 뷰를 생성해주자.
```html
<!DOCTYPE html>
<html xmlns:th="http://www.thymeleaf.org">
<head>
  <meta charset="UTF-8">
  <title>블로그 글</title>
  <link rel="stylesheet" href="https://stackpath.bootstrapcdn.com/bootstrap/4.1.3/css/bootstrap.min.css">
</head>
<body>
<div class="p-5 mb-5 text-center</> bg-light">
  <h1 class="mb-3">My Blog</h1>
  <h4 class="mb-3">블로그에 오신 것을 환영합니다.</h4>
</div>

<div class="container mt-5">
  <div class="row">
    <div class="col-lg-8">
      <article>
        <input type="hidden" id="article-id" th:value="${article.id}">

        <header class="mb-4">
          <input type="text" class="form-control" placeholder="제목" id="title" th:value="${article.title}">
        </header>
        <section class="mb-5">
          <textarea class="form-control h-25" rows="10" placeholder="내용" id="content" th:text="${article.content}"></textarea>
        </section>
				<!-- id가 있을 때는 '수정' 버튼, 없을 경우에는 '등록' 버튼 노출 -->
        <button th:if="${article.id} != null" type="button" id="modify-btn" class="btn btn-primary btn-sm">수정</button>
        <button th:if="${article.id} == null" type="button" id="create-btn" class="btn btn-primary btn-sm">등록</button>
      </article>
    </div>
  </div>
</div>

<script src="/js/article.js"></script>
</body>
```
- 수정할 때는 id값이 필요하므로 input 엘리먼트의 type을 hidden으로 설정하여 엘리먼트를 숨긴다. 또 th:value로 글의 id값을 저장한다.
- 그리고 th:if 문법을 사용하여, id값이 있을 때는 수정 버튼을, id값이 없을 때는 등록 버튼을 노출하도록 한다.
이제 수정/생성 기능을 위한 API 구현을 해보자.
article.js파일에서 다음의 코드를 추가하자.
// id가 modify-btn인 엘리먼트 조회
const modifyButton = document.getElementById('modify-btn');

if (modifyButton) {
    // 클릭 이벤트가 감지되면 수정 API 요청
    modifyButton.addEventListener('click', event => {
        let params = new URLSearchParams(location.search);
        let id = params.get('id');

        fetch(`/api/articles/${id}`, {
            method: 'PUT',
            headers: {
                "Content-Type": "application/json",
            },
            body: JSON.stringify({
                title: document.getElementById('title').value,
                content: document.getElementById('content').value
            })
        }).then(() => {
            alert('수정이 완료되었습니다');
            location.replace(`/articles/${id}`);
        });
    });
}
이 JavaScript 코드를 article.html 파일에 연결해주고, 클릭 이벤트도 동작할 수 있도록 추가해준다.
그리고 article.html 파일의 수정 버튼에 id 값과 클릭 이벤트를 추가해주자,
<button type="button" id="modify-btn"
                        th:onclick="|location.href='@{/new-article?id={articleId}(articleId=${article.id})}'|"
                        class="btn btn-primary btn-sm">수정</button>
여기까지 글 수정 기능을 구현해봤다.
이제 바로 글 생성 기능도 구현해보자.
먼저 articleList.html 글 목록 뷰에서 id가 create-btn인 글 등록 버튼을 추가해주자. 이 버튼을 누르면 글을 등록할 수 있게 하자. 그러기 위해서 article.js 파일에 생성 기능을 작성해보자.
등록 버튼을 누르면 에디터에 입력한 새로운 데이터를 가져와서 글 생성 API에 관련 요청을 보내주는 코드를 추가하자.
// 생성 기능
const createButton = document.getElementById('create-btn');

if (createButton) {
    createButton.addEventListener('click', event => {
        fetch(`/api/articles`, {
            method: 'POST',
            headers: {
                "Content-Type": "application/json"
            },
            body : JSON.stringify({
                title: document.getElementById('title').value,
                content: document.getElementById('content').value
            }),
        }).then(() => {
            alert('등록 완료되었습니다');
            location.replace("/articles");
        })
    })
}
id가 create-btn인 엘리먼트를 찾아, 그 엘리먼트에서 클릭 이벤트가 발생하면 에디터에 입력한 title, content값을 생성 API로 POST /api/articles 요청을 보내준다.
글 생성/수정 기능까지 구현 완료!
외부 도메인으로부터 데이터를 가져와서 우리 서비스 DBMS로 insert 해보기
RestTemplate : HTTP 통신을 위한 도구임. 외부 도메인으로부터 데이터를 가져오거나 전송할 때 사용한다.
1. https://jsonplaceholder.typicode.com/posts API 호출 (RestTemplate 사용)
2. json -> Object (ObjectMapper 사용)
3. Object -> DB 저장
코드 수정해서 다시 해보기
'Back-End > Spring' 카테고리의 다른 글
| [Spring] 스프링 시큐리티 블로그 만들기 (0) | 2024.03.19 |
|---|---|
| [Spring] 필터와 인터셉터 (0) | 2024.03.18 |
| [Spring] JPA로 CRUD 블로그 만들기 실습 정리 (0) | 2024.03.12 |
| [Spring] API와 REST API/MyBatis 블로그 만들기 실습 정리 (0) | 2024.03.11 |
| [spring] 강의 중 개념 정리 (외부) (0) | 2024.03.08 |